Tuesday, March 20, 2012

Pirate Sisters

Monday, 3/5/12 - I've been wanting to do a Big Sister-Little Sister lunch for a while, to celebrate her baby sister, and thought this would be a fun one!
Pirate Sistarrrs
PBHoney "Big Sister" pirate, Biscoff "Baby Sister" pirate, Rainbow Goldfish,
bean sprouts w/carrot flowers, yogurt, strarrrrberries w/grapes
Scurvy Pirates: For the Big Sister pirate, I used my large nori punchers to make a face out of spinach, and I used two different smaller ones for Baby Sister's eyes and mouth. I cut the hats out of purple cabbage, spinach free-hand. The "skull and crossbones" is just a carrot coin and carrot shreds.

Starfish: I put Rainbow Goldfish crackers and bean sprout "seaweed" with carrot "sea anemones" in brownish star cups (I got mine in a variety of colors on eBay.)

Sailing the Seven Seas: I added unsweetened blue Kool-Aid powder (Ice Blue Raspberry Lemonade, I think) to her lightly sweetened with honey Greek yogurt. The yellow bento spoon looks kind of like an oar! Yarrr! I also tucked a bendy straw under the large sandwich, in case she wanted to slorp it up instead.

Strarrrrberries and Grapes: I cut the berries into hearts, just 'cuz I can, and added a pirate flag pick for fun.
Captain Mama's lunch:
Spinach salad /purple cabbage and carrot scraps, alfalfa sprouts; Rainbow Goldfish, Russian dressing,
Greek yogurt, apples w/grapes
Since I was packing this lunch the night before, I didn't want the crackers to get soggy, or the dressing to slime up my salad overnight. But I was also too lazy to find one of my Smidgets and a lid for the dressing. So I just used silicone muffin cups. Piled on top of the salad, they were flush with the lid, so no spilling, and air-tight enough to not soggy-up my crackers! Scooore!
I normally don't include dairy in my lunches, as I'm lactose-intolerant. And lazy. And would rather use that slot for DESSERT! But while I was dishing out yogurt for her, I thought it would be yummy for dipping my fruit in. Boy howdy! Greek honey yogurt was just PERFECT for my grapes and apples. YUM! (And yogurt doesn't actually trigger my symptoms. Plus I have had good success with my one-a-day Lactose Intolerance pill.)

In our EasyLunchboxes. Bento spoon with fish from Daiso, BPA-free spoon and fork in my lunch from Dollar Tree, star cups imported from China via eBay, dressing in mini cup (I got mine at World Market.)
I was already behind on posting the Mice Are Nice lunch, so posted that instead of this one when I made this originally. Then we ended up rushing to the hospital and staying through the weekend before I could get this one up. And then other lunches cropped up and I forgot about this little cutie. So I no longer remember what she ate, other than she refused to eat the sandwiches because of the cabbage hat! Gah!


Monday, March 19, 2012

How to: Mess up Home-Made Fruit Juice Gummies

I saw a recipe for making your own gummies/fruit snacks using Jell-O and gelatin. Which got me all excited, since I have a ton of cute chocolate, candy, and ice molds, with no actual desire to mold chocolates. But I wasn't thrilled with not being able to control the amount of sugar, due to the Jell-O being pre-sweetened. Plus the whole artificial flavors and color (not that I'm totally opposed. I do use Kool-Aid powder to color and flavor Z's yogurt!) But if I'm making something from scratch, and I don't need it to be a particular color, why not make it without the dyes?
Then a friend of mine on Facebook posted a picture of her own home-made fruit snacks, using just juice and gelatin powder. So I pounced and demanded asked nicely for the recipe. I tried it and totally messed it up, so I'll give you the recipe as she told it to me, and tell you how I ruined it, so you can avoid my mistakes.

Home-Made Fruit Juice Gummies
Ingredients:
2/3 cup fruit juice concentrate (thawed, if using frozen)
4 to 5 0.25oz packets gelatin powder
Directions:
Step 1: Pour juice (and water if you wish to dilute flavor, or have a stronger concentrated juice) to small saucepan.
Step 2: Sprinkle gelatin powder over the juice and let sit for a few minutes.
Step 3: Put the pan over medium heat and stir until gelatin is completely dissolved.
Step 4: Pour mixture into molds (pouring it into a measuring cup or other container with a spout first makes this step much easier!)
Step 5: Allow to set at least 20 minutes. You can speed this up a bit by putting them in the refrigerator.
Kids can help with choosing the mold(s) (if you have multiples to choose from, that is!) measuring and pouring the juice, and tearing open the packets of powder and adding them in. You can also have them stir before turning on the stove. If you're prepared to watch them like a hawk and have hands ready to slap aside any sloppy arms, you can let them help stir while the stove is on as well.
But the best part is "Official Taste Tester." We made a little science experiment out of it and I let her try one at various times within the 20-minutes-to-set window, so she got to see and feel first-hand how they changed over time.

Note: 5 packets of gelatin makes the gummies very chewy. For softer ones, use only 4 packets. Or make a double batch and try 9, to hedge your bets.
Using silicone ice cube trays works exceedingly well, but you'll want to gently pull the edges of each one away from the sides before attempting to remove them. Greasing the trays first avoids this effort, but then they taste like PAM.
I used a lingonberry syrup concentrate from IKEA. Frozen concentrate usually calls for 1 part frozen juice to 2 parts water, and this stuff called for 1 part juice to 6 parts water. So I added another 2/3cup water and planned for another 4 more packets of gelatin to compensate for the stronger concentration. And it gave me more to work with. Only I tasted it and it felt too strong. So I added another 2/3cup water. And set aside another 4 packets of gelatin. Except that I didn't take into account that the gelatin would dilute the flavor even more. So I messed it up and mine ended up tasting very weak. Ah well.
I also flinched, after adding the gelatin to the juice mixture. All I could see was a solid mass of undissolved powder, so I thought that my snacks would be all grainy. So I added more water and juice while it was heating up. Then changed my mind when I saw the gelatin was dissolving and clearing up, and added more gelatin to compensate. Which ended up being a mistake, since instead of blending in and dissolving, it just clumped right up. Doh!
And all the frantic mixing while it was heating up caused a bunch of frothing, which ended up setting as an opaque, bubbly layer on top of the mold (so on the bottoms of the shapes.)
But with my extensive candy molds I was able to make unicorn and ducky lollipops, flowers, train-shapes, zoo animal-shapes, even little trinket-box shaped snacks (with lids!)

 [This post contains affiliate links.
Using a fishie ice-cube tray from IKEA, I'll be able to make custom One Fish Two Fish, Red Fish Blue Fish snacks for preschool next year! And since I had so much extra mixture, I also made flowers, starfish, and hearts.
Luckily, my little Podling loves them. She doesn't care that they taste extremely weak. She wanted to eat the plain gelatin powder straight from the packet. (Bleah.) So the lumps of gelatin powder are a non-issue for her. And they have practically no sugar, since they are so diluted!
As far as I know you shouldn't need to refrigerate them, since most juices contain Vitamin C or citric acid, which are natural preservatives. Keep them in an air-tight container in a cool, dry area. But feel free to store them in the fridge if you plan on making large batches that will last longer.
I also used parchment paper to keep them from touching, so they wouldn't meld or stick together somehow, since I stacked them in layers in a container.


Friday, March 16, 2012

Seuss' My Many Colored Days Redux

Since she's used to having me trot her lunch leftovers out again and again throughout the day, she was unprepared for them disposing of her field trip leftovers. On the ride home from preschool, she asked for the rest of her lunch, please. And I had to break it to her that, like I'd been warning her all morning, she'd only had one shot at it, and that the rest had been thrown out. Poor thing was devastated. So she asked for another. Just like it. We compromised with just the My Many Colored Days sandwich.

My Many Colored Dinner
Purple cabbage, ham, cheddar and mozzarella rainbow "Me" sandwich.
Carrot scored to look like a flower on the ends, yogurt pretzels,
organic celery w/sunbutter and chocolate chips
Since this was her dinner, and would not be trotted out over and over again throughout the day, I didn't pack nearly as much food as usual. I offered to make it on a plate or in a box. She chose box. And since we weren't needing it in the car, I let her choose from amongst all my bento boxes. She chose an EasyLunchbox anyway. Which turned out to be a great choice, since I had forgotten about my MOMS Club board meeting, so we ended up taking the rest to-go!
She was so excited to start eating this, I almost didn't get any pictures!
I opted for chocolate chip "ants" for her Ants on a Log, since she's told me recently she doesn't like raisins. I was worried that she wouldn't eat the celery, so I told her she couldn't have the pretzels until it was all gone. Woot! I wasn't sure how the sunflower butter would taste, but I wanted to give it a try, both to use up the sunflower butter before it expired, but also just to see how it would measure up if we ever had to go to a nut-free lunch for school. (Her preschools now are peanut/tree nut-free, but they just eat snack there, not lunches. And I can pack a nut-free lunch for her drop off school the three or four times a year they go on field trips!)
It was pretty tasty. I might actually prefer it over peanut butter for this.


Many Scrappy Returns
My dinner: Salad (see below,) sandwich scraps,
Chex Mix (see below,) celery w/sunbutter and raisins
Leave no sandwich behind! Since I opted to save time, I made the sandwich first, then cut out the shape (normally I cut everything separately, to make sure the edges are all crisp. Plus if I'm using spreads instead of meats and cheeses, it keeps the cutter clean! Woot!) My cheeses and cabbage weren't all large enough for the full shape this time, so I faked it and kept it in a sandwich-shape, rather than fanning them out to show off the colors. But that left a whole rest-of-the-sandwich. So I ate it. The cabbage was a little weird, texturally, but the whole thing tasted just fine... could have used a tiny smidge of mayo or butter though, to add more moisture.

My salad is made of green leaf lettuce (whatever kind that is! But that's what the list from my CSA said!) purple cabbage scraps, celery bits; candied cashews, sesame seeds, and dried cherries from ex-Chex mix; raspberry vinaigrette. Gramma Barp had made two kinds of gluten-free Chex mixes for Unka Chris' birthday party a few weeks back, and gave me some to take home. The nuts and cherries were from the Chex Honey Nut Cherry Crunch that I had... but a mysterious pint-sized someone ate just the Honey Nut and Rice Chex's - leaving me the nuts and cherries. Hmmm... So I figured rather than throw them out, I'd try them on my salad! Pretty tasty!

The other Chex mix bits are the remnants of the PB and Chocolate Blast Chex Mix. Someone ELSE gobbled down most of the cereal from that, leaving me roughly 10 Chex's; the rest mostly peanuts and Ms. And crumbs. So I tossed the last few bits of cereal in the little compartment, and added some peanuts and Ms (Coast Guard colors, for Unka Chris!) for dessert.
Since I actually enjoy raisins on my Ants on a Log, I did raisins on two of them. But since I like to try anything new that I offer her (other than frogs legs!) I made one with chocolate chips. Pretty tasty too! I really enjoyed the feel of the solid hunk of chocolate in there. It was a nice textural difference.
Wonder Wish Kitty Girl loves her "beautiful lunches!"
She ate all her celery and pretzels, and a few nibbles of parts of her sandwich. Also a few nibbles of carrot. Then we had to go. I added in two Circus Animals cookies and some Apple Straws chips as a treat for staying out of my hair at the board meeting. She finished off most of the rest of her sandwich there, leaving only a little bread and most of the cabbage. She ate the cookies, but left most of the Apple Straws for me! Omnomnom!

Tweet Treat

Wednesday, 3/7/12 - Lunch for before preschool, between preschool and swim class, and after swim.
PBHoney tree w/strawberry and cheese accents, cotton candy "cloud,"
string cheese "eggs," raspberries, carrot shreds "nest" w/grape "eggs"
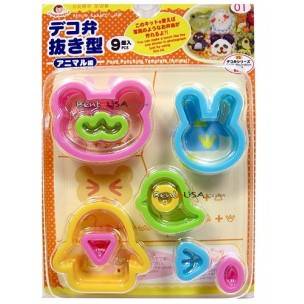
Tweet Tweet: I used a biscuit cutter to cut out two circles of bread for the tree (one slice from the heel, turned brown-side-in to camouflage it!) and cut a heel scrap into a trunk. I used a teeny circle cutter from a bento cutter set to make little "apples" from a thin strawberry slice, and used a bird cutter from the same set to make birds out of a slice of American cheese (mostly because they were pre-sliced and I was in a hurry. Otherwise I hate using "plastic cheese.") I used a toothpick to poke out eye holes.

Treat Treat: I had a bag of cotton candy that I had bought originally to make Truffula trees for Seuss week, but that never happened. So instead I used a bit to make a fluffy cloud! (And ziplocked the rest up to keep it dry so it won't crystallize. Maybe I can use it again...)

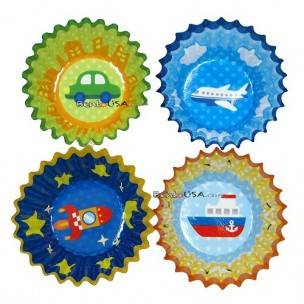
My Nest is Best: I had saved the carrot shreds from when I made a bunch of carrot flowers for preschool snack. The cheese nibblets are in an airplane cup, also left over from our snack day.
 She ate everything but the "nest." And she ate at least some of the carrot shreds!

A Red-Lettuce Day
My lunch: Green and red lettuce salad w/carrots, pretzels,
Goldfish crackers, and Russian dressing; Special K crackers,
string cheese nibblets, mandarin oranges 
Since it was Parent Ed day at the co-op preschool, I packed myself a lunch to eat while there. The cheese nibblets are in a vehicles bento cup only because it was left over from snack day.
Since the Goldfish crackers with Russian dressing were such a win on a previous spinach salad, I thought I'd test out pretzel bits too. Meh. The cheesy zest of the Goldfish is far superior.
As an added bonus: here's what they did that day as part of their transportation-theme month - a "drive-in" movie! They had decorated their "cars" the previous class day with paint, personalized licence plates, construction paper wheels, and paper plate "steering wheels" on brads so they'd really turn!

Both lunches in our EasyLunchboxes
animal cuttersvehicle cups 

Wednesday, March 14, 2012

My Many Colored Lunch - Disposable-Style

At drop-off preschool on Tuesday, they read My Many Colored Days by Dr. Seuss. And then at her co-op preschool on Wednesday, it was there in the fun room book shelf too! And the teacher let her borrow it to return next week at our next class. So naturally she wanted a Many Colored Days lunch! And 3,816 re-reads!
Since Thursday was a field trip to the Tacoma Children's Museum, she needed a nut-free disposable lunch. I figured it might as well be a Many Colored Nut-free Disposable Lunch!

Z's Many Colored Lunch
Strawberries, cookies, cabbage-ham-cheese-cheese sandwich, mini orange w/carrots, snap peas w/Goldfish crackers
On Bright Red Days..: I cut up a few strawberries and put them in a red foil cupcake liner.

On My Orange Days That's How I Feel: A mini orange (mandarin?) "ball" with carrot "stars" (cut out craptastically with my V-blade.) In a dotty orange liner.

Green Days. Deep Deep in the Sea..: Green sugar snap peas and a few green Rainbow Goldfish crackers (they use natural food dyes!) in a green (and pink and white) striped cupcake liner (from World Market.)

Happy Pink: Three pink Circus Animal cookies in a mini pink baking cup (no clue where I got it. I pick stuff up everywhere!)

Many Colored Me: Using the second-smallest cutter from a graduated gingerbread man cutter set, I cut brown bread, purple cabbage, pink ham, and orange (cheddar) and white (mozzarella) cheese "Me's." Both slices of bread are hiding underneath. And you can't see the purple cabbage very well either. But it's there! I drew on a face with food pens (I used Wilton, but they're garbage on anything with oils in it, like cheese. Betty Crocker ones work well (and you can find them in many grocery stores,) as do Americolor pens - and they have a wider array of colors!)
Just like the end of the book!
To make it completely disposable, I not only used paper liners (instead of my silicone ones,) but I put it all in a re-purposed plastic strawberry clamshell. To prevent little parts from falling out of the holes in top and bottom, I lined it with paper towels, with a layer of parchment paper over the cheese (so the face colors don't rub off onto the napkin.) I also scrunched up some aluminum foil to fill the space so everything doesn't tumble around too much.
I'm not sure how they're keeping track of whose lunch is whose, and the strawberry farm sticker wasn't exactly adorable. So I used some foam stickers to make my own label! (I wrote her name on it after taking the pic.)
Technically, other than the foil cupcake liner and foam stickers, everything is compostable or recyclable!
Since Baby E got RSV and was in the hospital all weekend, I was told she'd still be contagious for another week. RSV in older kids is just like a cold, but in littler ones can cause breathing problems... which is why we went to the ER on Thursday night! I didn't want to risk getting my friend's little one sick, so I didn't end up going with Z on her field trip. So no pics of her eating, and no clue what she actually ate! I asked her, but she said it was a secret. Hrm.

**Update! The teachers took pictures of her day!
WonderWish KittyGirl not only did her own "make-up," she also didn't lose track of her ears while having fun!